
In this article
Someone just watched your reel. They tap your name. Then they leave without following.
That is a profile problem, not a content problem. Instagram profile optimization means setting up the few things a stranger sees in those first seconds, so they know who you are, why to follow, and what to do next. These eight steps fix each part, in the order that matters.
Before You Start
- The Instagram app on your phone, logged in to the account you want to fix
- One sentence that finishes “I help ___ do ___” (you will use it in your bio)
- A rough list of your five to ten best posts by saves, shares, or reach (if you cannot see this data yet, Step 1 covers the account switch that unlocks Insights)
- About 30 minutes and a notes app, so you can draft your name field and bio before you paste them in
Here is the map for the rest of this guide. Every step below fixes one numbered part of this profile.
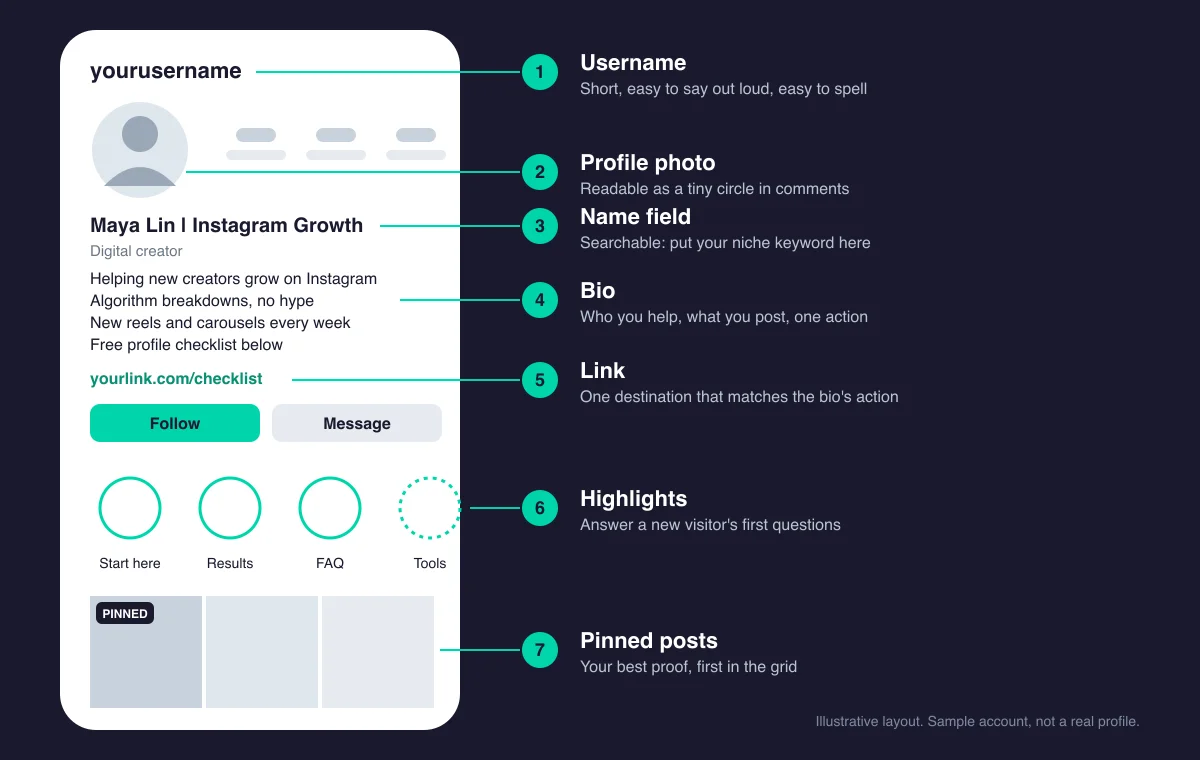
Step 1: Switch to a Professional Account and Pick a Category
Start here, because it unlocks the tools the other steps rely on.
Instagram lets you switch a personal account to a professional one, either Creator or Business, from your account settings. Both types give you Insights. Per Later’s Instagram bio guide , professional accounts can also add contact info to the profile, and depending on account type and region, action buttons. Choose Creator if your goal is audience growth. Choose Business if you sell products or services. If you are unsure, pick Creator and switch later.
Then set a category. It shows under your name, so it works as a free extra line that tells a stranger what kind of account this is. Pick the one closest to your niche, such as “Educator” or “Digital creator.” If nothing fits, hide it. A wrong category is worse than none.
Quick win: Switch the account today, then open Insights and note your profile visits and new follows for the past week. If Insights shows nothing yet, start your baseline a week from now. You will need it in Step 8.
Step 2: Choose a Username and Photo That Pass the Thumbnail Test
Your username and photo appear in comments, in DMs, on the Explore page, and next to every reel. They also appear very small.
Username. Instagram allows up to 30 characters, per Hootsuite’s bio guide , but shorter wins. Aim for a name that is easy to say out loud and easy to spell. Avoid strings of numbers and underscores. Changing your username changes your profile link, so only do it if the current one hurts you, and update the link everywhere you have shared it.
Photo. Instagram crops it to a circle and shows it tiny. Use a close-up of your face, or a simple logo mark if you run a faceless account. Choose even light, strong contrast, and a centered subject.
Run the thumbnail test. Comment on one of your own posts, then look at your photo next to the comment at arm’s length. Can you tell what it is? If not, crop tighter or simplify.
Use the same photo on your other platforms. When someone finds you on TikTok or YouTube after seeing you on Instagram, a matching photo tells them they found the right person.
Step 3: Put Your Niche Keyword in the Name Field
The name field is separate from your username, and it is the most underused line on your profile.
Per Hootsuite’s guide , the name field takes up to 30 characters and is searchable, and Instagram’s search uses the keywords in your name and bio to surface relevant profiles. Instagram does not publish exactly how it ranks search results, so treat this as one useful signal, not a guarantee. It costs nothing to set up.
Use the format Name | Keyword. For example, “Maya Lin | Instagram Growth” fits in 27 characters.
Three rules:
- Use words your audience types. Pick the phrase a stranger would search, not a clever title.
- Keep it readable. “Instagram Growth Tips Reels Followers” looks like spam, and people scroll past it.
- Match your recent posts. The keyword should describe what your last ten posts are about.
Test your choice. Search the phrase you picked and see which accounts appear. Notice how the top ones word their names.
Step 4: Write a Four-Line Bio
Your bio is where a visitor decides. Instagram gives you 150 characters, per both Hootsuite and Later , so every line needs a job.
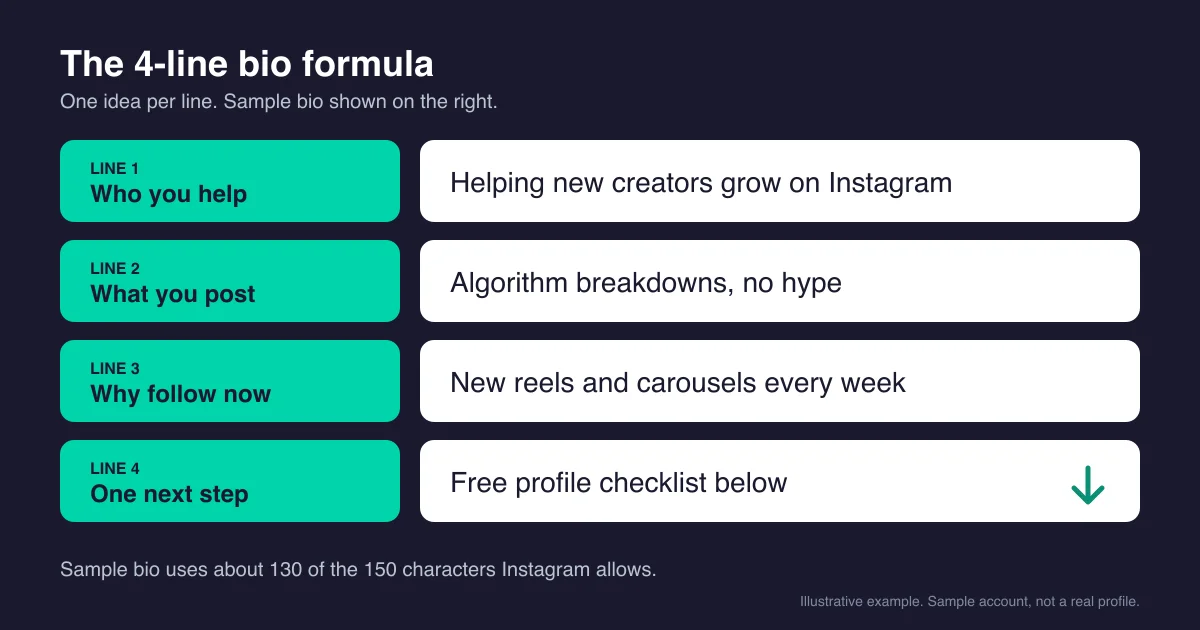
Write one line for each job:
- Who you help. Name the reader, not yourself. “Helping new creators grow on Instagram.” Put your main keyword here.
- What you post. Say the topic and the tone. “Algorithm breakdowns, no hype.”
- Why follow now. Give a reason to follow today: a posting rhythm, a series, or a result you can back up. “New reels and carousels every week.” Only claim what is true.
- One next step. Tell them what to do, then point at your link. “Free profile checklist below.”
Compare that with a common bio: “Creator | Dreamer | Coffee lover | DMs open for collabs.” It tells a stranger nothing about what they will get. The four-line version uses about 130 of your 150 characters and answers all three questions from the intro.
Use line breaks so each idea sits on its own line. Use an emoji only to mark the action line. Later recommends using emojis sparingly to highlight calls to action. If you want more personality, our guide to writing a witty Instagram bio shows how to add humor without losing the message.
Want to see how the algorithm scores the posts behind your profile? The free Instagram Algorithm Decoder gives you a scorecard for your last 10 posts against the signals Instagram ranks on. Takes about 15 minutes. Free. No pitch.
Step 5: Point Your Link at One Action
Your link is the only place a profile visit can leave Instagram. Give it one job.
Instagram lets you add up to five links, per Hootsuite and Later. More links do not mean more clicks. Your bio’s last line makes a promise, and your first link should deliver exactly that. If line four says “Free profile checklist below,” the link goes to the checklist sign-up page, not your homepage.
If you need more than one destination, use the extra slots or a link page, but keep the most important link first. Whichever setup you choose, the top link should match the promise in your bio.
Professional accounts can also add contact buttons. Add only the ones you will answer. An email address you never check costs you the leads it was meant to catch.
Step 6: Build Highlights That Answer a New Visitor’s Questions
Highlights sit right under your bio. According to Later’s guide to Instagram Highlights , they stay on your profile past the 24-hour Story window and live front and center. That makes them the closest thing your profile has to a menu.
Build three or four Highlights, each answering one question a stranger has:
- Start here. Who you are and where to begin. Point to your best two or three posts.
- Proof. Real results, real screenshots from your own account, real comments. If you have nothing real yet, skip this one. Never fake it.
- FAQ. The questions people already send you in DMs, answered in a few frames.
- Resources. Your tools, your favorite links, or your free download.
Post the Story first, then add it to a Highlight from the Story viewer or from your archive. Keep titles short so they do not get cut off. Use simple covers in one color palette so the row looks planned, not accidental.
Step 7: Pin Your Best Posts and Clean Up the First Row
The top of your grid works like a portfolio. Instagram lets you pin posts there, so a new visitor sees your best work first, not your most recent.
Pick by data, not by taste. Open Insights, filter your posts by reach, saves, or shares, and shortlist the top performers. Then pin a mix:
- One post that shows what you do
- One post that proves it works
- One post that tells a new visitor where to start
Now scroll the first few rows of your grid the way a stranger would. Does it look like one account about one topic? Archive posts that do not fit. Archiving hides a post from your profile without deleting it, so you keep the post and its data.
Step 8: Read Your Numbers and Change One Thing at a Time
Profile optimization is not a one-time job. Insights, available to professional accounts, shows your profile visits and taps on your link. Compare those with your new follows over the same period.
Divide new follows by profile visits. That gives you a rough share of visitors who chose to follow. It is not a benchmark to chase. It is a baseline you compare against yourself.
Then run the loop:
- Change one element, such as the photo, the name field, or the bio.
- Wait about two weeks so you have enough visits to compare.
- Check whether the follow share moved.
- Keep the change or roll it back, then pick the next element.
If you change the photo, the bio, and the link in the same week, you will not know which one worked.
Once your profile converts visits into follows, more reach pays off. To grow that reach, see our guides on increasing Instagram engagement and the best time to post on Instagram . To measure it, use the Instagram Engagement Rate Calculator .
Before you close this guide, score your profile:
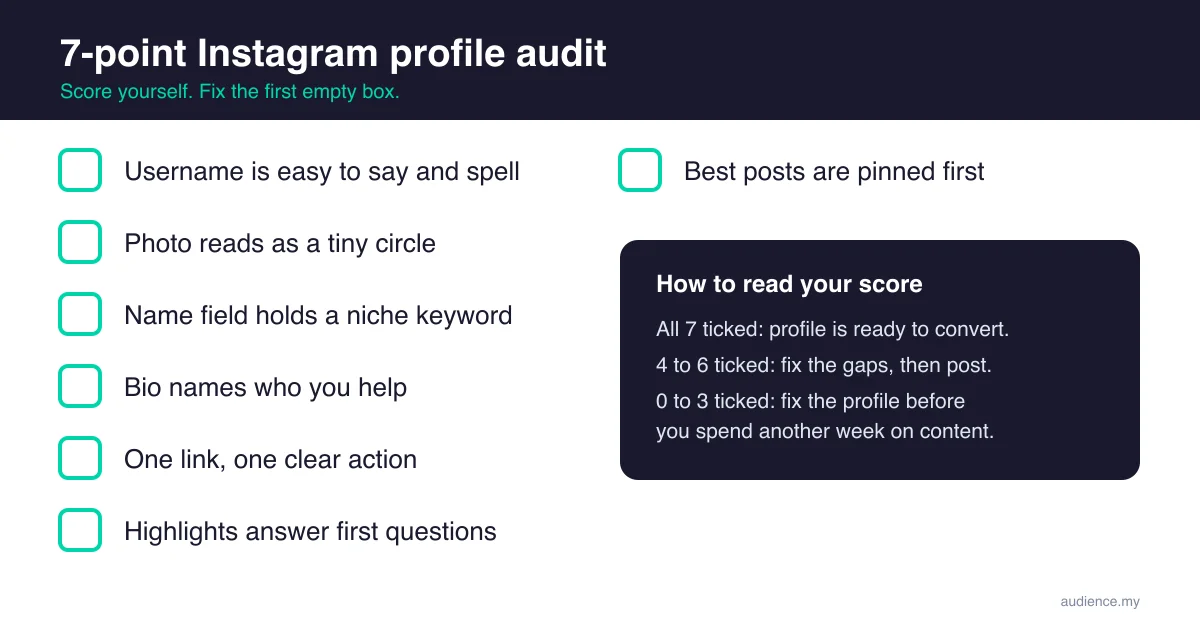
Fix the first empty box, then work down the list.
Common Mistakes
1. Writing a Bio About You Instead of the Reader
“Dreamer. Coffee lover. Creating daily.” describes you, not what a visitor gets. A stranger asks “what is in it for me?” in the first second. Lead with who you help and what you post, and save the personality for line three or your captions.
2. Leaving the Name Field as Just Your Name
Your name matters to people who already know you. Everyone else needs a keyword. Without one, you give up a searchable line, per Hootsuite’s note that Instagram search reads the name field. Add your niche after your name, and keep it under the 30-character limit.
3. Sending Visitors to a Homepage
A homepage asks a visitor to figure out what to do. Your bio just told them to do one thing. Send them to the exact page that finishes that promise, and make the first link match the last line of your bio.
4. Changing Everything at Once
A new photo, new bio, and new link in one weekend feels productive. It also makes your results unreadable. Change one element, wait about two weeks, and read the numbers before the next edit.
5. Buying Followers to Make the Profile Look Busy
Bought followers do not comment, save, or share. They inflate your follower count and pull down every rate you measure. A real visitor who checks your posts sees no real comments, and that hurts trust more than a small honest number.
Frequently Asked Questions
How do I optimize my Instagram profile?
Work through seven parts in order: username, photo, name field, bio, link, Highlights, and pinned posts. Instagram gives you 30 characters for the name field and 150 for the bio, per Hootsuite, so use both to say who you help and what to do next. Then check Insights and change one thing at a time.
How long can an Instagram bio be?
An Instagram bio can be up to 150 characters, according to both Hootsuite and Later. Four short lines work well for most creators because they scan quickly on a phone: who you help, what you post, why to follow now, and one next step. Leave a few characters of room for line breaks.
Does the Instagram name field help people find me?
It can help. Hootsuite reports that the name field allows up to 30 characters and is searchable, and that Instagram’s search uses keywords in your name and bio to surface profiles. Instagram does not publish its full ranking rules, so treat a keyword in your name as one useful signal, not a promise of results.
How many links can I add to my Instagram bio?
Instagram lets you add up to five links to your bio, per Hootsuite and Later. Put the link that matches your bio’s call to action first, because Instagram shows it first. A link page can hold more destinations, but the top link should still match the main promise your bio makes.
Keep Reading
What to Do Next
Choose the path that fits where you are right now.
Get the Instagram Algorithm Decoder
Score your last 10 Instagram posts against the six signals Instagram rewards now, then fix the weakest signal first.
Get the Instagram DecoderGet the Instagram Algorithm Decoder
Get the free Instagram PDF with six ranking signals, approximate weights, and a self-audit for your last 10 posts.
Get the Instagram Algorithm Decoder